Attack/Counterattack near El Hamma 27th March 1943
German Forces
from 15th Panzer Division
1 Platoon Panzer III kurtz (short)
1 Platoon Px III lang (long)
1 Platoon Pz II
1 Panzer IV F2
1 Marder
1 supply truck
1 timed Stuka strike
1 FAC in Sdkfz 250

British Forces
from 2nd Armoured Brigade
Forward HQ in Grant Mk1 gun tank
2x Sherman tank squadron consisting of 3 Sherman III tanks
1 carrier section from 1 The Rifle Brigade consisting of 3 carriers with 1 Bren team 1 2" mortr team and 1 Vickers MG team
FAO in Daimler Dingo
FAC in Humber Scot car
Radio link in M5 halftrack
1 battery of 25 pounders (off table)

Battle
We used the attack/ counter attack from the rulebook to represent this typical encounter as the 1st Armoured disision supported by 2nd New Zealand division fought towards Gabes on the Tunisian coast after breaking through the Tebaga Gap. The 15th Panzer Division fought despearately to allow Generel Messe to evacuate hs forces from the Mareth Line before the bulk of the axis forces facing 8th Army were surrounded by the advancing British. Our scenario would represent just such a clash around a farm as the desert gives way to lusher contryside near the coast. Historically these armour counter attacks allowed a PaK line to slow the British advance and the Germans and Italian forces to escape to their next line of defense the Wadi Akarit - 15 miles beyong Gabes. This is not a strict historical refight but an in the style of fight encountered over the period- sudden armoured counterattacks against the advancing British and Commonwealth forces.
AAR The view from 2nd Armoured Brigade HQ
The core of the army was the tanks. I spent all the points I could on tanks from the list. By agreement I used the Overlord lists with heavy adaptions for Tunisia (removing Fireflys, limiting the choice of Sherman models etc). Stats and points for the Grant Mk1 are from Russian Kursk list (Lee included as a Russian option). Carrier section a compromise between the Tobruk and Overlord books. You have to be creative with the lists and have an understanding opponent to play these sorts of games where the lists haven't been devloped. There is a danger in this kind of pick and mix that you can break the game. However we are both pretty good stickler for historical forces and have a lot of trust that the other. We had agreed to ignore the minimum infantry rules (as in Tobruk) because we had agreed on a tank scrap and my opponent had alot of new late DAK tanks he wanted to throw inagainst my mid-war US supplied Shermans. I ended up choosing some infantry anyway- the carrier section feels very characterful for these desert games, even though these can be a liability in Battlegroup representing alot of BR chits if used poorly and roughly handled. The DAK brought no infantry at all - I suppose they are all on there way to Wadi Akarit! The supply truck the DAK brought instead proving a excellent choice.
Terrain set up we decided that the terrain should be denser than that in the Western desert representing the tickly inhabited and well tilled coastal plain of Tunisia. So we included Olive groves, fruit fields a few trees and a small set of colonial farm building with rocky high ground on either side. There where 4 objectives the T junction, the farm, the high ground east of the farm and the fields west of the farm. Objectives are key to creating movement into games forcing you to move and contest or lose alot of BR.
My intention was to use the tanks and take on the panzer directly. I would refuse the left and advance on the right and centre seizing three of the objectives. The strength of the Sherman III in this environment with the bulk of the German tanks likely to be earlier models of Panzer 3 was a bit of an unknown.
With the German SPG and 3 Panzer III kurtz on the table my tanks form 9th Queens Royal Lancers arrived in bulk on a good roll all 6. The Shermans split into 2 squadrons one headed for the farm and seized the first objective using the road to make good speed. The second group moved left with the low rock hill as there objective.
The rest of the German forces arrived. Panzer II rolled forwrd on my left through the Olive grove toward the objective in the field beyond. In my turn the Grant Mk1 which was my HQ arrived with his radio link vehicle and used his artillery spotter ability to call in the off table 25 poundes of the Royal Artillery. I hoped that the light tanks moving on the left would be threatened by the guns and risked a good chace of being knocked out if they were hit and that the pinning of the barrages would slow their advance. So I decided to use the artillary to help secure the left flank and let the tanks fight it out across the centre and right.

Shermans continued to advance by bounds with at least one tank staying put and using Open Fire order and aimed to cover. The other moving tanks firing on the move with HE to pin the German tanks. It slows the advance but worked reasonably well to slow the German Panzers attacks. The RA artillery spotter in his Dingo arrived in the final wave of armoured reserves. Particularly the deadly Panzer IV "special" with it's long 75 gun which I decided represented the greatest threat to my Shermans. The "special" as a result spent alot of time pinned by HE fire. But as this forced my opponent to take counters and get the tank bak in the game I was quite happy.
The Marder with it's Russian 76.5 gun proved a deadly opponent from its position on the hill. Accounting in the end for two Shermans including the commander of the squadron. The resupply truck parked next to it meaning it kept up a withering fire. The advancing Panzers kept my guns firing at them and left the SPG to do it's work. Unless the RAF turned up!
The tanks of both sides now began a long range tank duel all around the Farm buildings. The infantry carrier section moved up to occupy the farm but in this armoured dogfight only their Vicker MG offer any defence from attacking German armour. So this went on ambush orders incase the panzer approach close enough to be pinned.
My intention was to leave the infantry holding the farm buildings whlst the armour swept on. The German counter fire disrupted the attack pinning tanks. The Marder KOed one tank and the arrival of a well timed and aimed Stuka strike pinned one tank, destroyed another and pinned the infantry forcing me to unpin the tanks and get the attack moving again. In the centre the loss of two tanks put the 9th Lancers on the defensive. The Stuka strike felt like a turning point in the game it had arrived a a critical moment preventing me from advancing as too much was pinned and destroyed pulling my teeth with only 2 75mm guns able to fire next turn. On the left the artillery slowed but did not stop the advance of the German light armour. The Grant continued to give the Panzers something to worry about it's 37mm turret gun a worry for the light tanks and once one of the Shermans got their range with it's powerful 75mm gun several were pinned and destroyed. But the attack used up ammo and prevented my advance. The arrival of an RAF Kittyhawk and its destruction of the long gun on the Marder could make up for the fact that the tanks were rapidly running out of ammo.

With 4 Battle rating remaining but only a single AP shot left and all the officer dead I opted to withdraw the remaining tanks . I new the Germans must be close to there BR total (in fact afterward it was revealed to be just 1 point away) but the armour simply had nothing left to fight with.
Another close run and hard fought game conceded to the German Panzers. A couple a lucky ricochetes off armour from the Panzer III and the lack on a supply trck cost me the game. But you can't complain to much about the luck of the dice - it'll even out over time . The Germans as ever played a perfect game (and a perfectly timed and positioned Stuka strike)without any real errors to exploit and that won them the game.
German Forces
from 15th Panzer Division
1 Platoon Panzer III kurtz (short)
1 Platoon Px III lang (long)
1 Platoon Pz II
1 Panzer IV F2
1 Marder
1 supply truck
1 timed Stuka strike
1 FAC in Sdkfz 250

British Forces
from 2nd Armoured Brigade
Forward HQ in Grant Mk1 gun tank
2x Sherman tank squadron consisting of 3 Sherman III tanks
1 carrier section from 1 The Rifle Brigade consisting of 3 carriers with 1 Bren team 1 2" mortr team and 1 Vickers MG team
FAO in Daimler Dingo
FAC in Humber Scot car
Radio link in M5 halftrack
1 battery of 25 pounders (off table)

Battle
We used the attack/ counter attack from the rulebook to represent this typical encounter as the 1st Armoured disision supported by 2nd New Zealand division fought towards Gabes on the Tunisian coast after breaking through the Tebaga Gap. The 15th Panzer Division fought despearately to allow Generel Messe to evacuate hs forces from the Mareth Line before the bulk of the axis forces facing 8th Army were surrounded by the advancing British. Our scenario would represent just such a clash around a farm as the desert gives way to lusher contryside near the coast. Historically these armour counter attacks allowed a PaK line to slow the British advance and the Germans and Italian forces to escape to their next line of defense the Wadi Akarit - 15 miles beyong Gabes. This is not a strict historical refight but an in the style of fight encountered over the period- sudden armoured counterattacks against the advancing British and Commonwealth forces.
 |
| The battlefield - German Panzers advance. |
AAR The view from 2nd Armoured Brigade HQ
The core of the army was the tanks. I spent all the points I could on tanks from the list. By agreement I used the Overlord lists with heavy adaptions for Tunisia (removing Fireflys, limiting the choice of Sherman models etc). Stats and points for the Grant Mk1 are from Russian Kursk list (Lee included as a Russian option). Carrier section a compromise between the Tobruk and Overlord books. You have to be creative with the lists and have an understanding opponent to play these sorts of games where the lists haven't been devloped. There is a danger in this kind of pick and mix that you can break the game. However we are both pretty good stickler for historical forces and have a lot of trust that the other. We had agreed to ignore the minimum infantry rules (as in Tobruk) because we had agreed on a tank scrap and my opponent had alot of new late DAK tanks he wanted to throw inagainst my mid-war US supplied Shermans. I ended up choosing some infantry anyway- the carrier section feels very characterful for these desert games, even though these can be a liability in Battlegroup representing alot of BR chits if used poorly and roughly handled. The DAK brought no infantry at all - I suppose they are all on there way to Wadi Akarit! The supply truck the DAK brought instead proving a excellent choice.
 |
| 9th Lancer tanks advance quickly |
 |
| The second squadron on the flank |
 |
| The second objective lies just ahead |
 |
| The lead tank grabs the objective |
Terrain set up we decided that the terrain should be denser than that in the Western desert representing the tickly inhabited and well tilled coastal plain of Tunisia. So we included Olive groves, fruit fields a few trees and a small set of colonial farm building with rocky high ground on either side. There where 4 objectives the T junction, the farm, the high ground east of the farm and the fields west of the farm. Objectives are key to creating movement into games forcing you to move and contest or lose alot of BR.
 |
| HQ arrived - a gun tank in this case |
 |
| The carriers from 1st Rifles advance toward the objective |
 |
| The tank duel begins |
 |
| The lighter Panzers used the olive grove as cover from the Shermans big 75's. |
 |
| The long range slugging match. One Sherman on the right pinned |
 |
| Two pinned by 50mm cannon fire |
My intention was to use the tanks and take on the panzer directly. I would refuse the left and advance on the right and centre seizing three of the objectives. The strength of the Sherman III in this environment with the bulk of the German tanks likely to be earlier models of Panzer 3 was a bit of an unknown.
 |
| The Grant observes for the Royal Artillery |
 |
| The Stuka strike |
 |
| The airstrike was not decisive but marked a change in the tide of the battle |
 |
| Shermans fire from hull down |
 |
| Pinning the "special" |
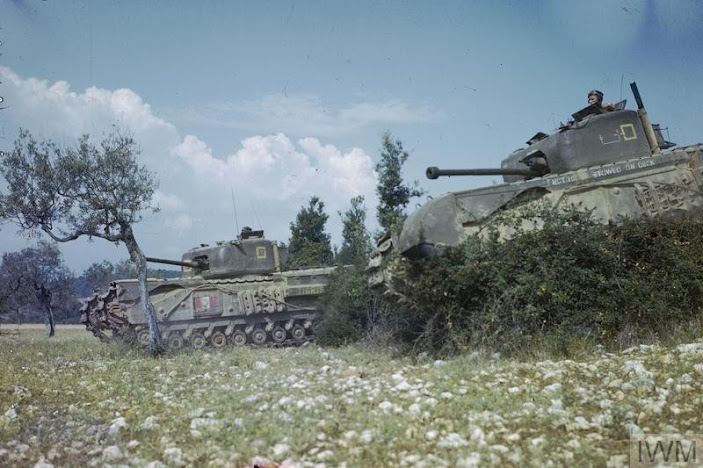
With the German SPG and 3 Panzer III kurtz on the table my tanks form 9th Queens Royal Lancers arrived in bulk on a good roll all 6. The Shermans split into 2 squadrons one headed for the farm and seized the first objective using the road to make good speed. The second group moved left with the low rock hill as there objective.
 |
| The support - Humber for the Forward aircontroller. Radio halftrack to ensure contact with the artillery |
 |
| Pinned again! |
 |
| The Grants high ammo capacity (14) kept it fighting till it was KOed |
 |
| More tanks than remaining shots - worrying |
 |
| Lots of pinning made it hard to advance on the right - the smoke beside a tank represents pinning |
 |
| Another Panzer III destroyed |
 |
| Panzer II vs Sherman! |
The rest of the German forces arrived. Panzer II rolled forwrd on my left through the Olive grove toward the objective in the field beyond. In my turn the Grant Mk1 which was my HQ arrived with his radio link vehicle and used his artillery spotter ability to call in the off table 25 poundes of the Royal Artillery. I hoped that the light tanks moving on the left would be threatened by the guns and risked a good chace of being knocked out if they were hit and that the pinning of the barrages would slow their advance. So I decided to use the artillary to help secure the left flank and let the tanks fight it out across the centre and right.
 |
| The dingo Forwrad observer took over from the Grant - keeping up the barrage all game |
 |
| Another Stuka strike this one a random air attack counter, It proved less deadly then the timed strike. |

 |
| A victim of the Panzer IV specials long gun. |
Shermans continued to advance by bounds with at least one tank staying put and using Open Fire order and aimed to cover. The other moving tanks firing on the move with HE to pin the German tanks. It slows the advance but worked reasonably well to slow the German Panzers attacks. The RA artillery spotter in his Dingo arrived in the final wave of armoured reserves. Particularly the deadly Panzer IV "special" with it's long 75 gun which I decided represented the greatest threat to my Shermans. The "special" as a result spent alot of time pinned by HE fire. But as this forced my opponent to take counters and get the tank bak in the game I was quite happy.
The Marder with it's Russian 76.5 gun proved a deadly opponent from its position on the hill. Accounting in the end for two Shermans including the commander of the squadron. The resupply truck parked next to it meaning it kept up a withering fire. The advancing Panzers kept my guns firing at them and left the SPG to do it's work. Unless the RAF turned up!
The tanks of both sides now began a long range tank duel all around the Farm buildings. The infantry carrier section moved up to occupy the farm but in this armoured dogfight only their Vicker MG offer any defence from attacking German armour. So this went on ambush orders incase the panzer approach close enough to be pinned.
 |
| Tanks take our second objective |
My intention was to leave the infantry holding the farm buildings whlst the armour swept on. The German counter fire disrupted the attack pinning tanks. The Marder KOed one tank and the arrival of a well timed and aimed Stuka strike pinned one tank, destroyed another and pinned the infantry forcing me to unpin the tanks and get the attack moving again. In the centre the loss of two tanks put the 9th Lancers on the defensive. The Stuka strike felt like a turning point in the game it had arrived a a critical moment preventing me from advancing as too much was pinned and destroyed pulling my teeth with only 2 75mm guns able to fire next turn. On the left the artillery slowed but did not stop the advance of the German light armour. The Grant continued to give the Panzers something to worry about it's 37mm turret gun a worry for the light tanks and once one of the Shermans got their range with it's powerful 75mm gun several were pinned and destroyed. But the attack used up ammo and prevented my advance. The arrival of an RAF Kittyhawk and its destruction of the long gun on the Marder could make up for the fact that the tanks were rapidly running out of ammo.
 |
| RAF P40 Kittyhawk destroyed the Marder SPG |
 |
| The Grant destroyed and the Sherman's withdraw out of ammo. |

With 4 Battle rating remaining but only a single AP shot left and all the officer dead I opted to withdraw the remaining tanks . I new the Germans must be close to there BR total (in fact afterward it was revealed to be just 1 point away) but the armour simply had nothing left to fight with.
Another close run and hard fought game conceded to the German Panzers. A couple a lucky ricochetes off armour from the Panzer III and the lack on a supply trck cost me the game. But you can't complain to much about the luck of the dice - it'll even out over time . The Germans as ever played a perfect game (and a perfectly timed and positioned Stuka strike)without any real errors to exploit and that won them the game.
 |
| British final BR total |
 |
| The Germans win by a narrow squeak. |
Nice looking terrain and table set-up.
ReplyDeleteLove the awesome terrain, especially field and buildings...and the pictures with the plane are just stunning, great report!
ReplyDelete