Trial by Fire- Teploye 8th July 1943
An Attack /Defence scenario for Battlegroup
Victory
The first to exceed there BR rating. The German player captures all the objectives in the Teploye area. Russian player cannot win an all objectives secure victory.
Deployment
1. German attacker are from 4th Panzer Division with support from 505 Heavy Panzer Battalion and 3rd Funklenk company and begins in the North deployed within 12" of the Northern Board edge. As usual the German attackers have a First wave In this case made up of all its reconnaissance forces and additional units of the Germans choice up to a total of 1000pts.
The Second Wave of the forces arrive on turn three onwards on the North table edge. All units may arrive each turn from the beginning of each subsequent turn until everything is on the table.
2. Initial defenders are from 140th Infantry brigade supported by 3rd AT battalion. The Russian player on the South must deploy at least 1000pts of his force on the table in the Russian half of the table. To represent "Igishev's fortress" on Height 238.1 a force consisting of up to 500pt in the frontline zone with 12" of the centre line of the table these may have 10" of trenches and an AT gun Dugout and a minefield in addition to any defences they may have purchased . All these troops must be purchased from the Russian Infantry list.
Further forces up to 500pts may be placed on the table from the Reserves but any tanks placed in this way must be considered dug in. The main force and there defences may be placed anywhere within the Russian player half of the table.
3. The defenders reserve consists of units from 19th Tank Corps is the other 100pts of the Russian force some of these may be deployed on the table (see above) must be choose from the Tank Corps list and 2d6 may enter from the Russian table edge (South) after turn 4.
4. The defender places 4 objectives anywhere in the Russian half of the table one should be placed on Teploye village.
5. Weather conditions Roll d6. On a roll of 1 there is a sudden thunder storm grounding all air cover . Treat all air cover counters as a 1.
6. Deploy Germans first wave within 12 " of table edge in German deployment zone.
7. German players take the first turn.
8. 2d6 deployed Russian units may have ambush fire orders.
9. Russian reserves arrive 2d6 units at a time from turn 4 advancing from the South table edge
10. German second wave all units arrive at German table edge at the beginning of turn 3.
AAR
The otherside of the hill. How the battle went from the German Perspective
German Army List
For command and control each Gruppe received 1d6 + officers orders with extra orders from the 1d6 reserved by the overall commander along with control of the off-table artillery assets.
FHQ PanzerVI Tiger
Wire team
Luftwaffe FO team in Kubelwagon
1x Sdkfz222 recce AC
1xFerdinand Tankhunter
1x Panzer VI tank
2x Pz IV G platoons
2x Px III platoons
1x STuG III platoon
2x Panzer Grenadier platoon (1 with armoured )
1x Armoured Pioneer platoon
2x 120mm mortars
1x offtable 120mm mortar battery
2x time stuka strikes
3x first priority artillery requests
We divided the army into 3 Gruppe each around and infantry platoon
An Asault gun group these had all the supply vehicles assigned because of the low ammo storage on assault gun
A " Sturmgruppe " with the German Pioneer platoon a stretcher party and wire team and the only recce element an Sdkfz 222. The pioneers had flamethrowers and a Sdkfz251/16 flamethrower for trench and bunker clearance. It also had a Borgward unit attached (not shown in the photo)
A "Flank protection" Gruppe with more Panzer grenadiers in half tracks.
The whole force minus the off table support of 120mm mortar battery 2 timed strikes by Stuka dive bombers, a timed 150mm howitzer barrage and 3 1st priority calls to artillery.
The Borgward and it's STuG III control vehicle pass by the Forward HQ Tiger tank on there way to the Russian trenches
The Panzer IV G (the only model we fielded in this force) cross the wooded stream that marked the German frontline at the start of the game. The Russian made good use of registered target points to pin and destroy the German panzers here as they struggled with the difficult ground.
No place for an armoured car! The Sdkfz222 made good use of it's ability to spot for the 120mm mortars. Throughout the game the German army struggled with the artillery support. the moratrs were the only even vaguely reliable support.
The Ferdinand with a dedicated support truck hung back and blasted the Russians armour. This western end of the board closest to the village of Teploye didn't have much until later in the game just a few SU76 SPG's and enplaced 45mm AT guns. So in terms of points I am not sure it really paid of the huge cost. The Russian player dug in a "dummy tank" position opposite - it certainly fooled us.
Panzer VI G's again advanced bravely to dual with a very real dug in T34. Unknown to them right into the teeth of a Registered target point for the off table Heavy Artillery.
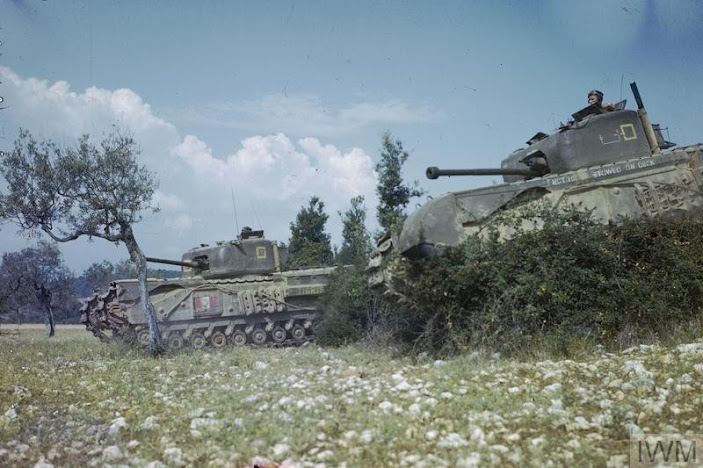
A dug in T34 visible in the distance
The cetre of the Russian position east of Teploye. Minefield in front (marked with a wrecked Kubelwagon). The Borgward attempts to destroy the minefield but was immobilised by an unsuppressed AT gun on the hill just before detonation). This was disastrous for the German Panzerkeil as they could not just sweep across the trenched and turn right as planned.
The poor performance of the artillery left the tanks trying to supress the entrenched Russian infantry with MG,s and the AT guns with HE.
The second wave arrives on the table - Infantry and light Panzer III at the back of the Panzerkeil wedge
Panzer Grenadier's with a "Stump" Sdkfz251/9 in support
AA defence on a Horsch, a wire team in there trench and the on table 120mm mortars and loader teams our only on table artillery - these where targeted by the Russian FO in aircraft and pinned down for most of the game.
Panzer III M and Pioneers with there SDkfz 251./16 (third vehicle from the front). Intended for assaulting the trench lines they ended the game in a desperate fight with Russian tanks in the wooded stream bed. An illustration of how badly the Germans plans went wrong.
Flammpanzer and the Kubelwagon for the FO radio problems and poor priority dice meant he had a very poor battle
The first of many! The VVS and Luftwaffe would turn up enmasse. This early Stuka attack driven of by 37mm AA fire. The gun can be seen on ambush fire in the orchard bottom left (The puff of grey smoke on the barrel indicates that it has an ambush order). The Stuka's target was the objective in the village. It would be the only one the Germans managed to capture all game
With Tigers at the point the Panzerkeil crawled forward. Pinning by artillery, the difficulty of crossing wooded wet stream bed and flanking fire from AT guns and dug in T34's meant the panzers crawled forwards instead of racing into the Rusian lines (very Kursk like). The Puff of smoke beside the Tiger indicates that it is pinned
The German centre - note the Borgward preparing to destroy a section of the many minefield covering the Russian infantry. The craters marks a Russian Registered Target point,
The German western (right) flank STuG and Panzer III M cross the minestrewn wheatfield carrying Panzer grenediers toward the village of Teploye
The Germans AA defence pinned many VVS planes. (Again the grey smoke indicates it has Ambush orders). Early on the Russian pulled several Air Attack chits and soon Pe-2 divebombers and IL-2 Sturmovik were straffing and bombing our tanks. Later it would be the Luftwaffe arriving in force with Ju-87 G and Henschel 129 stalking the Russian tanks. So many planes arrived that dogfights started to ensue- a rare thing in Battlegroup.
The Pioneers Stormtrooper still preparing for an assault toward the Russian front line this would be as far forward as they got.
The Panzerkeil at maximum advance Russian trenched in the distance. Panzer IV try to pin down the defenders whilst the Tiger took on the AT guns behind with some effect.
The view from the AA gun. A Pe-2 dive bombed the the Panzers. Warwick looking worryingly confident.
The most dangerous aircraft on the table a spotter plane for the Russian artillery
The Russian reserves arrive T70 lead the charge. It was clear to me that we had not made fast enough progress and hence forward we would be on the defensive on the eastern flank under constant pressure from waves of attacking Russian tanks.
A panorama looking west along the German front line. In the centre the Panzer Grenadier's make a gallant but doomed rush for the Russian trenches. I knew that it was now or never our poor radio communications checks and my poor choice in not getting enough Comms support in the Army lists meant that the Russian line was not as pinned down as I would like. But with the 19th Tanks Corp now beginning to arrive on the battlefield we needed to break the Russian line. So it was now or never. However, only the use of the (often forgotten) Fallback rule prevented a massacre
The Grenadier's prepare to charge covered by the MG teams trying unsuccessfully to achieves what our artillery refused to do and pin down the Russian infantry. But the high cover save made it too much. The minefields are still intact so the tanks cannot close any further and unless the infantry are dealt with using the minesweepers in the pioneer units will be suicide.
The first of several fall backs prevented the squad in the middle from being wiped out
The Ju-87 G arrives to target the T70 tanks
Having destroyed all resistance in the AT gun position west of the village. The STuG's and infantry have captured the outskirts of the village but house to house fighting ensued for the rest of the game. Eventually the stubborn Russian defence recaptured this objective
The Panzer III M on the left hit a mine. The field was marked by the signpost in front of the church.
The view from the air 37mm cannons made short work of an SU76
The unpinned the Panzer Grenadiers show that the Sdkfz 251 transports can get you out of trouble as fast as they get you into it. It was clear to me that the Panzer's now facing a second wave of T34's would need to re-arm so the infantry began to form a screen to hold off the advancing tanks. Only one Hanomag was destroyed in the retreat. and a liberal use of withdrawal orders got them out of harms way once the infantry deployed back in the stream bed.
The Tigers are now coving a general withdrawal across the eastern (left flank)
The VVS harasses them back to the start line. Tanks running low on AP and a lot of Russian armour bearing down.
Stll harassed by artillery and aircraft
Pioneers deploy into the wood with flamethrowers and AT grenades. They would prove far from toothless as the Veteran status allowed them to pass there close assault role against the Russian panzers.
The Pioneers platoon HQ even they would soon be battling T34 at close quarters.
Pioneers shore up the line held be the retreating Grenediers
The T34's bearing down and the Panzer IV burning all destroyed by Russian artillery to which we had no answer
Pioneers with flamethrowers prepare a hasty defence. In the distance the Panzers burn
The supply column - a Mercedes truck moves up to resupply the Panzers - The remaining tanks now had very little AT ammo left.
The Panzer IV covers the retreat to rearm
A dozen T34's Stal.Stal. Stal following the remaining T70
The Tigers seem indestructible this one was hit by a bomb and survived by the skin of it's teeth. The pinned halftrack will become a casualty og the following T34's.
The Russian view as they suffer a 120mm mortar attack - it hardly slowed them down.
Both Tigers blaze away with there last ammo at the advancing T34's the nearest Tiger was now shooting HE to supress the enemy tanks being completely out of AT ammo.
The dummy tank position it tricked us into an artllery barrage
The Russian FO overlooking the village
The Russian HQ in Teploye. The Russian never felt threatened enough the move it. Although Panzer Grenadiers where only 15 inches away!
The view from the Pakfront - these 45mm AT guns didn't destroy any tanks but they frequently pinned them forcing us to take BR counters to unpin and bogging down our advance.
The T34's race past the destroyed Panzers. A combination to the tanks attacks that kept us under the Rusian guns and the devastating artillery fire finish us on the eastern flank
T70's utflank the Panzer III this tank also had no AP ammo left and could only reply using HE
In the village the battle still rages and gives us some hope and a reason to defend at the other end of the table
Panzer II M supporting the infantry in the village with cannon fire. Attempting what our divisional artllery refused to do
STuG III do the same on the extreme right of our position
The Panzer III continued to give ground and fire at the T70's. The Russian felt it looked like panic but there was always a plan. The Tiger and remain STuG are reloading behind this desperate defence.
The HS129 turns up ( every aircraft chit has now been pulled - and successfully appeared). It strafes the T34's with it's cannon helping the defence.
The Ju87G joins it near Teploye. Here the Russians are also counterattacking. Anything to slow the tanks!
The German tide is definatey going out from the heights beyong Teploye.
"Desantniki" attempt to assault the German defence line and get roughly handled
Now battle tanks the Panzer hang on in Teploye but Russian pressure is building here too.
A STuG in the streets of T|eploye
Stretcher party support the pioneers as the destroy a T70 and a T34 with AT grenades in subsequent turns
The Russian infantry debussed from the destroyed tank are pinned in the woods beyond the HQ
More pioneers - carrying flamethrowers-race up to deal with them
The Sdkfz251/16 races out to deal with pinned Russian infantry - the Germans still have teeth!
The Sdkfz 251/9 Stump switch to AP to engage the T34's both of these halftracks are destroyed but cause casualties at close range forcing three BR counters on the Russian before being destroyed next turn.
The Tiger rearms but time is up. An amazingly close game. Huge damage done by both sides but a marginal victory by the rules. Although the tactical position meant that it was only going to get worse as we had just lost control of the objective in the village as well.
Reflection
A clear victory for the Russians although the BR ended up pretty close. The problem that underlay much of the rest was the artillery. Most of this fell on my shoulders as I wrote the list. There was some god awful dice rolling but I decided in the lists to go with the priority request approach. I want to keep flexibility of German artillery but (big but) I placed too much reliance on this method and did not include a lot more communication support one wireless team used up in Turn one then left us exposed to the vagaries of the dice in a crucial area. On reflection more counter battery and timed barrages would have been more effective particularly where,as here, the enemy is in fixed defences.
The Russians plan was strong (as to be expected from Warwick and Russ using the strength of the Russians large numbers used to keep us off centre pinning us into a artillery killing zone created by Registered target points. Our intention to keep moving and use our flexibility. Ultimately although we had local successes (in Teploye) the Rusian dictated were the battle was fought and how. That's why they won.
Thanks to all the Battlegroup megagame players Warwick, Fuzz and Russ for a brilliant game. I ended up providing the entire German force including all the aircraft as well as about half the terrain including all the buildings and defences. It was nice to see (almost) all the toys on the table.... lets do it again soon!


Great AAR!
ReplyDeleteConrats on a great game!
I concur with your opinion.i would have purchased all possible timed barrages as allowed, and time them to fall on turn 1 on top of his prepared defnces.
Also, a comms vehicle is a must for those off table mortars.
Regarding PRT's, they are insanely powerful for the soviets.
Once found, the best possible option is to reserve move over them. That way you can moce to full speed turns at once and bypass them.
Thanks again for the awesome report!