In our campaign themed around Column Bari's attack on the 8th Army position north of Medenine during Operation Capri. The winner of each scenario gets to choose the points and scenario for the next battle. So my Italian opponents beat off the Black Watch in the last battle and chose to make a flanking attack at our next location Kef Abhdala an important pass through the hills I chose 600pts from the Battlegroup torch British Armoured Division (with 1943 changes) my opponent chose 600pts from the Italian Infantry Division list.
 |
| Google maps satellite image of the area today. The Italian army would win the reconnaissance battle and choose to attack from the \northeast. The British from the South west |
Italian Reconnaissance troops . The truck contains a Bersaglieri patrol. The Spetzia Division won the reconnaissance battle and took first turn with there main force.
British SAS jeep patrol seize the first objective using Behind enemy lines
The Bersaglieri deploy into the date plantation that would prove heavily contested during the battle
The Autoblinda AC supports them with its cannon
The Italians deploy 65mm howitzers in a date grove near the Kef , Excellent support from Italian artillery on and off table was a critical factor in the battle
Italian infantry scale the heights and seize there first objective (marked by the smashed British gun. This Height the Kef Abhdala gave them an excellent vantage point over the battlefield and would be gradually reinforced through the game We decided that this feature would be difficult ground for Vehicles before the game began
The British artillery arrives in the form out 75mm guns on the Autocars with a resupply lorry in tow
They begin to engae the plantation infront with direct fire to pin the Bersaglieri taking cover there
The Regia Aeronautica make and appearance with a timed airstrike which catches the advancing British in the Wadi pinning much of the main force.
Italians' artillery deployed in the small date planation north of the Kef. The Motor patrol is pinned by Howitzer fire
The 47 mm AT gun in the plantation (towed by a captured Austin!) takes out the Daimler armoured car. The British recce deployed to try and grab the Kef fist loses the race and begins to take severe handling from the Italians - particularly the guns!.
The RAF turn up with a timed strike from a |Kittyhawk Below the Italian guns in the palms whilst the infantry hold the exposed hill top.
More infantry reinforce the Kef. This objective is slipping beyond the grasp of the British
Howitzer, mortars and Auto Sahara patrol busy at this point lashing British recce patrol with High Explosive. The artillery concentrated on the reconnaissance virtually wiping it out in two turn. Only part of an infantry foot patrol survived the game
The Italians on top to the Kef. Inexperienced Italian infantry grab an objective and then sit tight to hold the position whilst the artillery breaks up
British attack. This is the best use of this kind of troops. Good cover saves prevent too many casualties
The Bersaglieri the best Italian infantry
put up a tough fight in the valley around the third objective. Exchanging fire with the SAS who call down mortar fire in return were here a track meets the road through the pass.
A LMG Bersaglieri element cover the road through the pass . At this stage the Italians looked very strong holding two objectives in strength with the advanced elements of the British counter attack pinned or destroyed. However strong reinforcement arriving with the British main force 3 Crusader 1 tanks and accompanying Motor Infantry of Queen's Regiment prepared to attack the valley.
The 75mm Autcars soften up the Italian forward elements
The senior officer preparing to use his reroll to ensure plenty of orders for the attack.The radio truck nearby to keep the link with the off table mortar battery.
Quad tow for the 25 pounder gun the Universal Carrier has the Forward observer team for the gun.
Italian reinforcements arrive by tankette
Italian tankettes and engineers arrive rounding the hill supporting the Bersaglieri in the valley and flank support for the Infantry on the Kef .
An Italian 47mm antitank gun after the tow toils up the steep hill. Beyond a HMG team on a Motor Guzzi tricycle further reinforces the hill. A very sticky prospect for any future assault by the Queens' regiment.
A SP gun advances using the wreckage of a Daimler for cover intending to outflank the British advance,
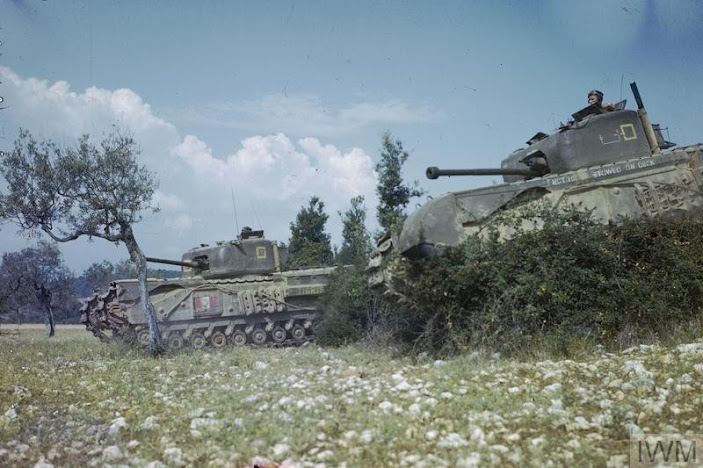
It proves no match for the Crusader 1 tanks and their two pounder guns from the ridge
The Italians attempt to outflank the British on the ridge runs into trouble when the Crusaders counter attack. Auto Sahara patrol forced to retreat.
Italian infantry advance in support of a sweeping flank manoeuvre The destruction of there armoured support caused a withdrawal as the fortunes of war swung back toward the British
Bersaglieri hold out to the last as a combined infantry and tank assault comprehensively destroy the recon troops and there armoured car. The road and its objective pass into British hands with a bayonet charge from the Queens' regiment destroys the last defenders.
However the spotters for the Italian division artillery and howitzer have excellent observation of the valley
Italian infantry inexperienced but in good cover are well positioned to hold the remaining objective.
Reinforce with a Heavy machine gun and Antitank guns that start to take a toll of the British forces in the valley.
Led by tanks the assault finally has momentum All resistance in the valley plantation has ceased the road is firmly in British hands
British infantry sweep down the slope The carrier section meant for a break through had to be used as hasty reinforcements due to the fierce Italian resistance
The Italian artillery takes its toll. The SAS lost to a direct hit from a 105mm gun as was the 75mm Autocar many infantry men also lost taking the ridge and valley.
Explosion mark the impact of the Italian "big guns". The Crusader was a victim of it's own unreliable fuel system catching fire as it climbed out of the wadi. although it has infantry riders at the time my opponent graciously didn't insist on a d3 casualties as it was the Crusaders own engine that caught fire.
Italian fire from the artillery relentlessly rakes British line. The twenty five pounder pounds the Kef Abhdala in return but it's an unequal battle.
But it is a wild barrage that destroys the Matador heavy truck in the wadi - the final straw for the British. Unable to resupply the 131st Brigade battlegroup withdraw.
The final Position of the Infantry from the Queen's Surrey Regiment. holding two objectives but defeat by well handled Italian infantry and guns. The Italians where only 2 away from breaking themselves - "a damn close run thing".


No comments:
Post a Comment