
Scenario and AAR - Near Allam Haifa September 1942


Near Alam Haifa Ridge September 1942  

 http://www.desertrats.org.uk/Maps/alamhalfa_map.jpg

History 

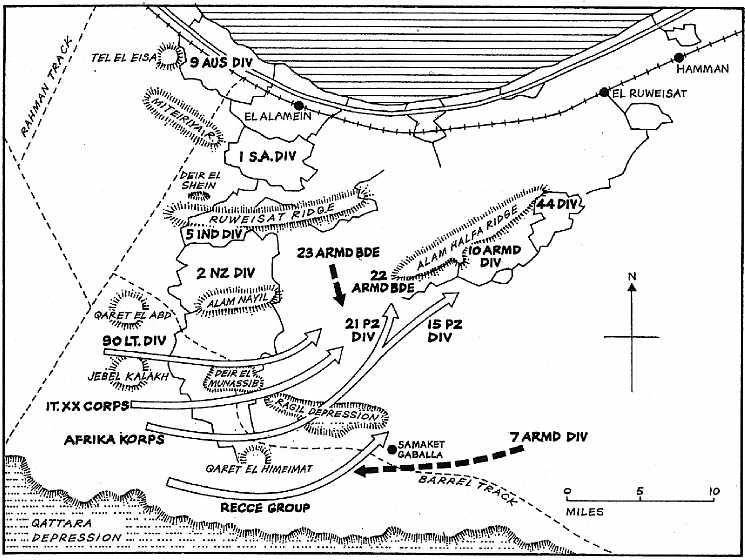
Erwin Rommel's final offensive of the desert war was a great chance to use some of my Valentine II tanks as well as some borrowed Crusader I's in an armoured scrap with the Deutches Afrika Korps using there upgraded Panzer III. The Afrika Korps pushed through a lightly defended stretch the the British defensive line and envelop the position from the South. Passing at night through the wide minefields the DAK moved against the Alam Haifa Ridge where the British forces had established a defensive line. The 44th Division held the ridge whilst the 22nd Armoured Brigade newly re enforced with the Valentines of 23rd Armoured brigade counterattacked the German division. Severely constrained by lack of fuel and under frequent air attack the DAK withdrew on the 2nd of September back through the minefield. Marking the end of German strategic initiative in North Africa. Now all Rommel and his men could do was await the British counter stroke.

Terrain  

The table had few features. Mainly dominated by two low rises and a few patches of bushes on the low ground. The two ridges run almost at right angles to each other

Deployment

The events of Alam Haifa suit several of the scenarios but as I wanted to make use of the Mobile Warfare special rule an Attack/Counterattack scenario for the rule book seems perfect.

Special Rules

Duststorm special rule is in efect as is the Mobile warfare special rule. Low on fuel would be appropriate from the British to buy but I did not in this scenario.

Victory  

There are four objectives. The valley marked by a wrecked car in the foreground, the low ridge at the near end of the table, the narrow pass at the far left (marked with a cow) and the valley beyong that marked with a burnt out car. An all objectives claimed victory is possible. Or the usual first to their Battle Rating total.


Deployment 

The DAK out scouted the British and chose the far right corner (by reference to the initial deploymet picture below). The British took the opposite corner
Reconaissance troops would deploy first with other units arriving afetr turn 2

Map

A patch of the Western Desert near The Alam Haifa Ridge 

After Action Report 

Forces 

All forces chosen from the Battlegroup Tobruk supplement ;

forces from 21st Panzer Division
 2 platoons of 3 Panzer III H  both officer with mortar spotter rule
1 Forward artillery Observer team in Light Car
1 Motorised Panzerjager with PaK 38
1 SdKfz 222 Armoured Car
1 Resupply Truck
1 battery of 2 80mm mortars off table

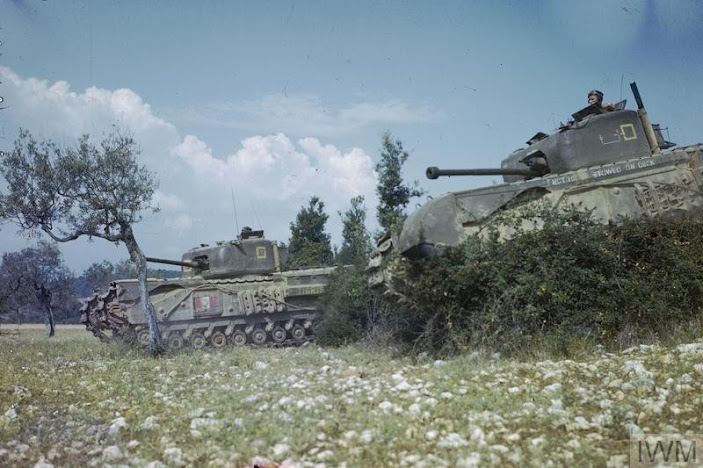
forces from 22 and 23rd Armoured brigades;
2 squadrons of 3 Crusader 1 tanks
1 squadron of 3 Valentine MkII tanks
1 motorised foot patrol 7 men in Morris truck
1 Royal artillery Forward Oberver
2 x 2nd priority artillery requests
1x 3rd priority artillery requests


With the aid of supperior recon forces the German's also get the first turn. The SdKfz 222 siezes the first objective whilst the PaK 38 is toward toward the ridge at the far end of the board. Aggressive reconaissance. Tne British sent out a motorised patrol to sieze there first objective the vally infront of their deployment area. The Morris truch would then hastily withdraw next turn.
The PaK 38 towed by it's halftrack to the ridge dominating the British deployment zone 

SdKfz 222 siezes it's first objective before moving on the sieze the second in the next turn.

British motor infantry grab an objective
The PaK 38 siezes a third objective for the DAK. The position overlooks the entry zone for all the British Armour. First of these to arrive are the three Valentine tanks who turn towards the ridge and begin the long climb under fire from the PaK 38. A single Crusader 1 arrives and takes the PaK 38 under ineffective fire.  The Morris withdraws rapidly whilst the infantry take scant cover in the scattered thorny bushes.
The threat presented by this well sited gun swung the course of the battle

The Germans main force started to arrive and push forward with plenty of orders they quickly solidified the DAK's grasp of 3 of the four objectives. Taking hull down positions or using the ground in the pass to screen there movement from the British

Panzer III go hull down while the SdKfz 222 covers the the forward move in the pass beyond the ridge. 
The DAK had all of there tanks but a lack of orders menat only some able to move forward. Meanwhile the attack by the Valentines of the ridge was failing hit by Antitank fore from the Pak and bracketed by mortar fire first one crew abandoned there tank and fled afetr a direct hit for a mortar bomb then a second abandoned there tank afetr a hit from the PaK. The Crusaders massed ready for a planned attack on the pass. The the British FOO  arriving in a bren carrier had considerable radio trouble leaving the British without artillery support for several turns. despite three attempts to bring the ridge under shellfire nothing hppened!
Abandoned Valentine tanks ... but one finally makes the ridge crest and outflanks the gun

The last Valentine is KO'ed by the supporting Panzer III, That all my best tanks gone . Just the unreliable Crusader left. 

The ridge finally falls under fire from the 3" mortars called up from off table. Phenominal cover saves mean that the PaK 38 is never pinned! Fritz and Gunthar (as we named them) obviously candidates for Iron Crosses with a rich target selection in the valley before them.
The Valentine troop all destroyed the Crudaders change plan. No more attack down the vally it's take the ridge or bust!. Two Panzer III knocked out by two pounder guns in successive turns. But the DAK take advantage of the Crusaders unreaible fule system to cause a breakdown that immobilaise the lead tank. The British had anticipated this problem and brought along a heavy repair lorry.
I desperation the infantry bring the gun under small arms fire. Unable to suppress the crew after several turns they finally killed 2 of the heroic German crew. The last man fails his moral check and suddenly the deadly gun is gone!
The Crusader advance by bounded toward the ridge. Another Panzer III is KO'ed by heavy fire from the Crusaders. The Briish have takeb 21 of 30 BR lost and the Crusaders are starting to run out of ammunition. 
But there are few Panzer III left a brief counter attack across the largest ridge left a further Crusader abandoned due to engine fire but the last Panzers and knocked out with the last Armour piercing round. Phew! That was close. The DAK drew an air attack chit. Luckily the Stuka's didn't swoop. So with British tanks sweeping forward to take on the rear areas with MG fire the DAK decide to withdraw 

The British final BR 

The DAK final BR 2 under the total required 

So the 8th Army can claim the better part of a draw! There is alot of damaged tanks around the ridges. Another fun close run Battlegroup game.


Comments

Popular posts from this blog

AAR The Bitter taste of Sugarloaf - Battlegroup Pacific War Scenario

Japanese defenders set up trench lines anchor the center, a pill box with AT guns out front covered by MG bunkers covering them. the furthest flank has a sniper on ambush fire (indicated by a puff of white smoke.  The US marines deployment on the Japanese right flank, Lots of small varied teams with a dizzying variety of equipment and specialisms. The rail line is actually in a shallow ravine so we agreed a special rule that shooting in and out could only be done from with 5" of the line. An artillery's observation bunker with FAO team. There is another off table on Half moon hill. This bunker was the only thing I placed on the ridge apart from the cave mouth which I placed nearby on the reverse slope. The bulk of the defenders would be hidden here safe from US air and artillery's strikes. The Japanese artillery's fire was efficiently suppressed all game by big off shore naval guns firing in the counter battery role. . Marine recon teams creep forward under fire from t

Scenario and AAR Vulcan Begins - Sidi Abdallah 27th April 1943

  Sidi Abdullah Pt 137 Churchill tanks go into action near Ksar Mesouar, 28 February 1943,. IWM  NA911 The History “27 April.  The night was dry and clear. For three and a half hours the MTF sat in their vehicles looking at the battlefield on their right. ‘A’ Coy, 1 RWK captured Sidi Salem after a hard fight. The enemy came in with a strong attack on Sidi Mediene with flame throwers and was beaten off by the Black Watch. The whole area was lit by flares, tracer, explosions from grenades and mortars. By 0330 hrs time was short if the lanes were to be completed by dawn. The mines in front of Sidi Abdallah had upset B Coy’s attack in an unexpected manner, Coy’s compasses were affected, direction lost and the OC decided to halt and wait for a day before making the attack. The 7th would therefore be going into uncharted country, not for the first time. A and C Sections prepared to clear the gaps by hand because the ‘Scorpions’ were unable to cross the Oud Hamar diversion. It is odd that

Scenario and AAR Clearing the Road to Bou Arada 11 January 1943

  Clearing the Road to Bou Arada   11 January 1943 The History On 11 January, a squadron of 2 Lothian & Border tanks was sent from Goubellat to clear the enemy from the area. Advancing on each side of the road, several of them got bogged down in thick mud created by torrential winter rain. 2LIR was ordered to protect the tanks while they were to be dug out of the mud. Two motor companies of 10 Rifle Brigade were involved and they headed south and then east to attack farms held by German units. They found the task impossible and were withdrawn after suffering five fatalities. Battle British are advancing and have first move. Heavy rain in recent days means that movement of road is in difficult terrain and vehicles can become bogged down if the leave the roads. The paratrooper of Herman Goering Jaeger Regiment are holding the farms to the East of the Bou Arada Road and preventing movement on the road. The  2 Lothian and Border Horse supported by 10 Rifle Regiment set out to cle