Battle for "The Spot", El Aroussa, Tunisia 26th February 1943
The History


Three days after the end of the battles at Kasserine the Panzer Army Afrika opened Unternehmen OCHSENKOPF against the British First Army intended to drive back the allies and lift the threat to Tunis. On 26 February, as part of as part of Unternehmen OCHSENKOPF, Panzers Panzer Regiment 7 and Jaegers of 2 Jaeger Battalion Herman Goring (Kampfgruppe Kleeberg) broke through the Allied Lines in the Mahmoud Gap south west of Goubellat getting between 38 brigade and 11 brigade and linked up with Hauptmann Schirmer's III./Fallschirmjäger Regiment 5. The pushed southward toward El Arousa having cut the Medjez road the Kampfegruppe Kleeberg attempted to seize El Aroussa and cut the supply route to 38 Irish Brigade and 1 Parachute Regiment defending Bou Arada. 10 Panzers and a part of 2 Jager regiment where approaching the town from the north and threatened to overrun Y division HQ a situation the Brigadier "Nelson" Russell commanding the Divison described the situation as "unpleasant". The ordered his reserve squadron from 51 RTR (Probably C company) back from Bou Arada to intercept and a squadron from 56 Derbyshire Yeomanry to delay the Germans and a race was on. The Brigadier described the view from the divisional HQ:
"We estimated it would take our 9 Churchills about two hours to reach the right place to block the Bosche. So the squadron of Derbyshire Yeomanry set out to delay the Bosch Panzers for two hours on a six mile stretch of road through the hills. It was going to be quite a race, and I found, through no fault of my own, the Divisional Headquarters was a grandstand quite close to the finishing post.
The Derbyshire Yeomanry was splendid. They laid mines, put down smoke, shot their two pounders when they could and imposed all possible delay on the Panzer, and all the time the Churchills lumber on towards “The Spot”, a carefully chosen place where he should have the Bosche on toast. It was also the last possible tank position and it wouldn’t do to be too late.
I doubt if I will ever forget the closing stage of his race – it quite beat Battleships National, when I’d backed 1st and 2nd. Ten Panzers and Nine Churchills converging from right angles, quite unseen to each other, but the Panzers didn’t know about the Churchills, and the Churchills knew all about the Panzers."
Sources are from "Bloody Road to Tunis" by David Rolf, The the war diaries of the 51 The Royal Tank Regiment; and the 25th Tank Brigade, and Brigadier Russell's account from The Irish Brigade website. https://www.irishbrigade.co.uk/brigadier-narratives/irish-brigade-in-tunisia-by-brigadier-nelson-russell/the-bou-arada-period-2/
Terrain
 |
| The area on a modern map. The town of El Aroussa lies off the map south and "Steamroller Farm off the map to the north. |
Flat and open grass land and rolling fields to the South and West rise to a low ridge stretching east to west. The ridge has fields and olive grove and rises to rough forested hills to the east - the Djebel Rhijane. The ridge falls to a narrow stream at its foot over which the road passes on a narrow bridge. The ground to the north is rough and broken. The road runs North to South and is a unmetalled but counts as road for vehicle movement. The area south of the ridge is flat open and gently rising farmland widely spaced trees and a few hedges. The fields are without crops at this time of year.
Forces
Historical-ish Forces - for Company Sized Battlegroup Game
British Forces from Y Division
970pts BR 60 +1d6 Officers 6 Scout 5
Delaying Force from 56 Reconnaissance squadron 1 Derbyshire Yeomanry
Armoured Car command in Daimler Dingo (Scout Artillery spotter)
2 Daimler Mk.I Armoured Car (Scout Mortar spotter)
1 Carrier Section of
3 men in Bren carrier (Officer, Mortar spotter)
3 men with Bren
3 men with 2" mortar
2 Infantry foot patrol each with 8 men with Bren (scout)
1 40mm Bofors AA gun medium with truck tow
1 Battery of 2 3" mortars off table
Main Force from 51 Royal Tank Regiment
True grit +1d6BR
Forward HQ (Senior Officer, Artillery spotter) in M5 halftrack
Forward Signals Unit - Medium Wireless truck
Forward Observer (Artillery spotter) in Bren carrier
1 Infantry Platoons from Faughs consists of:
Platoon HQ of 5 men in light truck (Officer mortar spotter)
3 Rifle sections 8 men with Bren in medium truck
1 light mortar team 2 men with 2" mortar
with 3" mortar and Vickers MG
2lb AT gun and light truck tow
2 Churchill tank troops each with 4 Mk.III/IV Churchill tanks
1 Mk. I Churchill tanks
2 1st priority artillery requests
Supply column 2 Medium Truck
German Forces from Kampfgruppe Kleeberg
976pts BR 71 Officers 5 Scouts 4
Aufklarungs force from 2 Jager battalion Herman Goering Division
2 Armoured infantry patrols in Sdkfz 250/1 (Scout Mortar spotter)
1 Recce command in Sdkfz 222 (Officer Scout Artillery spotter)
1 Armoured car Sdkfz222 (Scout Mortar spotter)
1 Assault Pioneer squad with flamethrower and 2 demolition charges in captured M3 halftrack
1 Light Bridging Unit in Sdkfz 251/7 (Bridging)
Heavy car with 20mm AA gun
Main force from Kampfegruppe Kleeberg
Forward HQ Sdkfz250/3 (Senior Officer Artillery spotter)
Luftwaffe Air Liaison Officer with Radio Van
Forward Signals Unit - Medium Radio Truck
1 Platoon from II Co. 2 Jaeger Battalion Herman Goringconsisting of;
1 Jager platoon HQ 6 men in Heavy Car (Officer, Mortar spotter)
3 Jager squads 5 men in medium truck with MG42 in medium trucks
3 MG squads 3 men with MG42
HMG team 3 men with hMG42 in Medium truck
Medium mortar team 3 men and loader team with 80mm mortar in Heavy Car
1 PaK38 AT guns with Sdkfz6 tow
1 additional Jaeger squad 5 men with MG42 and AT grenades in a medium truck
1 additional Jager MG team 3 men with MG42
1 Panzer III platoon of 5 PzIIIG
1 Panzer platoon of 4 PzIV F2
Off table 2 80mm mortar
1 first priority artillery requests
1 counter battery fire mission
Supply column 2 medium trucks
Scenario
Victory
The first battlegroup to exceed it's total battle rating must withdraw and loses the battle. If a player hold all four of the objectives then he may claim an all objective held victory regardless of battle rating.
Deployment
German
Objectives are placed on "The Spot" ridge, the road bridge over the stream and the NE ridgeline (see map). The German player has one objective which may be deployed anywhere outside of the main column and Aufklarung force deployment zone and not within 10 inches of another objective or the board edge.
The German Aufklarung force (2 Jager battalion Herman Goering Division) deploy in the Aufklarung deployment area
The German Main column (Panzer Regiment 7) deploy in the German main deployment area
The British Delaying force (Derbyshire Yeomanry) may deploy anywhere on the table outside the German deployment zone.
The British Flanking force (51RTR) deploys to the British deployment zone
German Aufklarungs force deploys from turn 1 may deploy anywhere within 10 inches of the German table edge.
The British Delaying force deploys from turn 1.
The delaying action by the Derbyshire Yeomanry last 3+1d3 turns.
German Main column arrive 1d6 units per turn after the delaying action is over from the Main Force deployment zone.
British Flanking force arrives after the delaying action from the British deployment zone (20" from SW table corner) at a rate of 1d6 units per turn.
Special rules
British barrages can only be harassing barrages until the Forward Headquarters or Forward Observer in main force is deployed. The 56 Derbyshire Yeomanry have mined the approaches therefore any special event drawn from the Battle rating counters may be used as a Mine Strike counter. Mine strike counters apply as usual but cannot be played anywhere within 5" of Assault Pioneers. The Churchill tank mobility rule applies. The highest hills are difficult terrain for vehicles (and covered in trees and scrub giving soft cover). The stream is in a deep "nullah" and crossing it is dangerous for all vehicles (except at the bridge).
Map
AAR - "My side of the hill"
I was to play British in this scenario. Warwick kindly agreed to take on Herman Goering's attacking Panzer's find his AAR on his blog at http://warwickkinrade.blogspot.com/. I had been looking forward to this first big game since lockdowns began I made a couple off
substitutions to the lists as written in the scenario above two Sherman tanks
was substituted for two Churchills and I substituted an M5 halftrack for a
white scout car the Forward HQ of 51RTR. Otherwise the models came from my own
collection Infantry mostly Eureka and AB miniatures Churchills and Bren Carriers from PSC and Sherman's from Italeri
My plan was to gain the high ground of the ridge and from
there engage and destroy the German forces. To achieve this I intended to use
the Derbyshire Yeomanry to try and hold the line of “the Nullah” at the foot of
the ridge and to delay and harass the advancing German forces as long as
possible. Then I would use the motorised Infantry to re-enforce them as soon as the main force
arrives and then to use the infantry to cover the advance of the slower
Churchill tanks whose job would be to engage and destroy the German Panzers.
Hopefully the Yeomanry would hold the objectives on the ridge and try and grab
the bridge as well, if possible.
 |
| Figure 1 The Yeomanry deployment below the ridgeline |
The Infantry foot patrols deployed in cover close to the
road in the olive grove and on the objective at the east of the ridge (we
marked this with a tree- but it represented the best observation spot on the
east of the ridge.) The Armoured cars deployed in the dead ground on the rear
slope of the ridge as did the carrier section. They could move quickly to the
front side of the ridge once the German first turn was over.
 |
| Figure 2 Carrier Section andvances to the Olive grove on the front of the ridge. These did not block LoS for this game. But did provide some cover for units inside them. |
The German advance on the east side (containing the
Sdkfz251/7 bridging) concerned me as I worried that the Germans might cross the
Nullah and outflank the defence from that direction. So the command armoured
car would advance and position itself to use the mortar battery to delay and
harass this attack. Meanwhile the Daimler Armoured cars and carrier section
infantry would try an capture the bridge.
The infantry foot patrols both advanced to try to get to the cover of the
Nullah.
The attempt to capture the bridge by coup de main is confounded as the tough veteran Jager
pioneers who dismount from there captured M3 halftrack and take up position in
the hard cover of the Nullah beside the bridge.

Dislodging tough veteran troops
like this from hard cover. I was also wary of the flamethrower that I know such
troops carry any vehicle on the bridge contesting the objective would likely be
an easy target for the flame thrower! The Yeomanry would need to keep there
distance.
 |
| Figure 4 The Jager Pioneers take cover in the Nullah beside the Bridge objective |
 |
| Fig 5 The Derbyshire Yeomanry seized the ground needed for my main force and hung on |
My concern was rapidly confirmed as fire from the Jager and mortar
fire resulted in the surrender and rout of one of the foot patrols. The Daimler armoured
car would now have to hold the road and I abandoned effort to attack the bridge. And
decided to hold on. The German mortar began to play on the Yeomanry.
 |
| Figure 6 The Headquarters Armoured Car of the Derbyshire Yeomanry advances up the ridge |
My harassing did not prevent the MG42 fire
pinning the infantry section. The Daimler Dingo armoured car HQ calling in the off
table mortar fire began a long duel as the German recce infantry attempting to
pin the car with long range fire from the halftracks machine guns.
 |
| Figure 7 Captured M3 Halftrack covering the bridge objective |
The German Aufklarung's had gotten into an excellent position repeated pinning and wounding
the armoured cars and infantry. I kept the Derbyshire Yeomanry in the fight taking
a counter every turn when time came to roll I was alarmed to see the reconnaissance
men would need to last another 3 turns. The armoured cars are nearly out of
ammunition for their 2 pounder guns I
drew several special counters but the German armoured cars and halftracks were
too busy laying a withering fire on my positions and not moving so I was unable
to play them as Mines Strikes. But they did keep the Battle Rating lower then the
Germans might think.
With plenty of orders and not much ammo I moved the Bofers
gun up the road to threaten the German armour car beyond the bridge. It worked The
Derbyshire Yeomanry are reduced to a ding and 1 Daimler and the two men with a Bren
guns from the carrier section and a constantly pinned foot patrol reduced to 7
men where all that remained .
 |
| Figure 8 The 40mm Bofers gun deployed to cover the road |
At last the main force began to arrive. Initials only 2
elements so I changed plan and decide to commit the Sherman's first – my fastest
moving troops in the Main force and rushed them up to the ridge I was lucky that
the German main force was also arriving fitfully with just a handful of Panzers
came down the road. The Sherman's engaged these The Yeomanry had hung on at a cost
in BR but the Main force now need to move quickly to occupy the ridge.
 |
Figure 9 The first Sherman III of the main force arrives. These tanks would prove more than a match for the Panzer III.
|
 |
| Figure 10 Sherman's advance as the 40mm is withdrawn |
The critical factor for the rest of the game would be the
arrival of each side main force. Could I get the slow but powerful Churchills
onto the ridge before the German panzers could make there weight of fire tell. With the main force also came access to the
big guns on the two first priority fire request. My eye still on the bridging
unit to the east (one armoured recce patrol had made it to the Nullah and
brought my infantry under fire with their MG) so still concerned about being
outflanked. I committed the first of my request and called on the Y Division
guns. The a lucky roll saw the 4.5” howitzers are free an accurate spotting
from the Yeomanry HQ in their Dingo unleashed a devastating barrage that would
destroy the Bridging unit and another half track and pin the infantry in there
position.
 |
| The Dingo mounted spotter decisively win there duel with the Eastern Bridge Force |
 |
Figure 11 Quite a Stonk
|
The eastern thrust thrust send to be neutralised and so the motorised
infantry tried again for the bridge and Nullah. However the arrival and quick
deployment of the tough veteran Jagers meant that the “‘Faughs” lost the race
to the bridge and a viscous firefight on the slopes of the hill began. The Bridge remained just out of reach without leaving the platoon dangerously vulnerable to a counter attack or concentrated fire. Battlegroup is merciless to infantry caught without cover I dared not risk coming up short.
 |
| Figure 13 The Faughs deploy into the scrub above the bridge |
 |
| Figure 14 The Platoon HQ deploy from their Morris MWB supported by the 2 pounder AT gun (this would be knocked out by a stalking MG42 team from the armoured recce patrol in the orchard) |
The Churchill squadrons where arriving in force as the
British main force arrived more swiftly than the German reinforcement (lucky
rolls for me here). I sent the Mk I with its 3” howitzer as close support for
the infantry – making good use of the Churchills mobility in hill climbs to
reach them.
 |
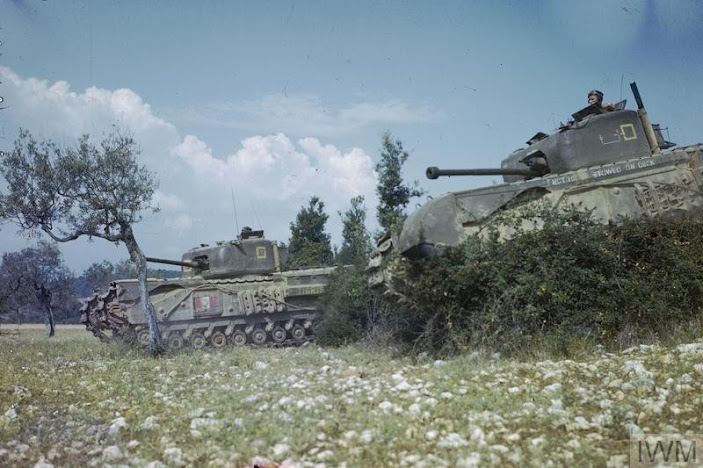
| Figure 15 MkIII Churchill tanks of 51 RTR advance past the CMP 15cwt lorrys of the motor infantry platoon |
 |
| Figure 16 Mark III Churchills and CMP 15cwt lorries deploying infantry onto the hill beyond. |
The rest pushed on to engage the German panzers. Slow
reinforcements meant that the Germans where unable to build up a weight of fire
and it was clear that the Panzer III are no match for the Churchill's 6 pounder
main gun. The ridge now seemed secure so sending an early arrival.
 |
| Figure 17 The Main Force Infantry and AT gun (pinned) in front the mixed Mark III and Mark IV Churchills line up exchanging fire with the Panzers beyong the ridge and preparing to advance. |
 |
| Figure 17 The German position as there main force schlerotically arrives. The Jagers trucks on the left. The Pak 38 deploys to cover the bridge. Meanwhile the Panzer III lead the way and the Panzer IV specials at the back |
The Tank “Adventurer”
down the road to challenge control of the bridge the rest of the Churchills began
to advance by bounds. I intended to use their excellent frontal armour and
mobility to roll down the ridge and force the German Panzers to stop me.
 |
| Figure 18 Churchill Mk III "Adventurer" reaches the bridge. The far end is blocked by a Panzer III |
A
Churchill hit a mine but it’s excellent rear armour meant is shrugged off the
strike. The Panzer IV specials long 75mm had quite a dose of bad luck
technically they have a good chance of penetrating the frontal armour but could
not manage it once despite several good hits. The Panzer IV own armour proved horribly
vulnerable to the Churchills main gun as the advance started to look unstoppable.
 |
| The Churchills exchange fire with Panzer III firing HE to try and suppress the heavier tanks |
 |
| Figure 19 The general position around the bridge around turn 10. As a Panzer III targets the side armour of a Churchill. Sherman tanks are still forward at this point engaging the Panzer III. |
 |
| Figure 20 A Panzer III duels the Churchill Mk III on the bridge, The Jagers of Rgt 2 have taken the Nullah beside the bridge others swarm up the rocky hillside towards the British defenders |
 |
| Figure 22 Adventurers contests the bridge - not sure that it looks like it could take a 40 ton weight! The Panzer III outflank in the background but at a terrible cost. |
 |
| Figure 22 Churchill three pushes past a KO'ed Daimler Armoured Car. |
 |
| Figure 23 The Churchill Mk1 opperates as support to the infantry on the rough hillside making good use of the 3" howitzer. |
The Forward HQ came forward to the ridge crest to spot for
the artillery. The Dingo sadly falling victim to another Mine Strike (probably
one of the Derbyshire Yeomanry's own mines!). Another good set of rolls brought
the Y division 4.5” guns into play again this time the Panzers where the focus another
excellently spotted stonk straddled the Panzer IV causing pins and direct hits.
Even the Germans own forward HQ was caught up in the chaos. A direct hit destroyed
yet another Panzer IV. As the first of
the Churchill tanks crossed the Nullah at
its midway point the German forces
realised that they had lost the race and began to with draw.
 |
| Figure 24 The divisonal artillery played a crucial role in breaking up the Panzers attack as well as knocking out several |
 |
| Figure 25 The general position as the German push finally runs out of steam. The guns of Y division hitting the Panzer IV tanks |
 |
| Figure 26 The source of that gun fire the Forward HQ on the ridge |
Historically the Herman Goering division withdrew Kampfgruppe
Kleeberg to “Steamroller farm” back 6 miles up the Goubellat road. They would
face the 51RTR this time supported by the Coldstream Guards the next day. That
battle scenario is cover in my blog post – the battle of Steamroller Farm above
!
 |
| Final Score for the British forces. Feeling confident. Two chits for air attack neither turn up! |
 |
| Final Score for German Force - remarkable numbers of 4 and 5 chits - the sudden German collapse had been a surprise. |


No comments:
Post a Comment