Friday, 5 June 2020

Scenario and AAR - Near Allam Haifa September 1942


Near Alam Haifa Ridge September 1942  

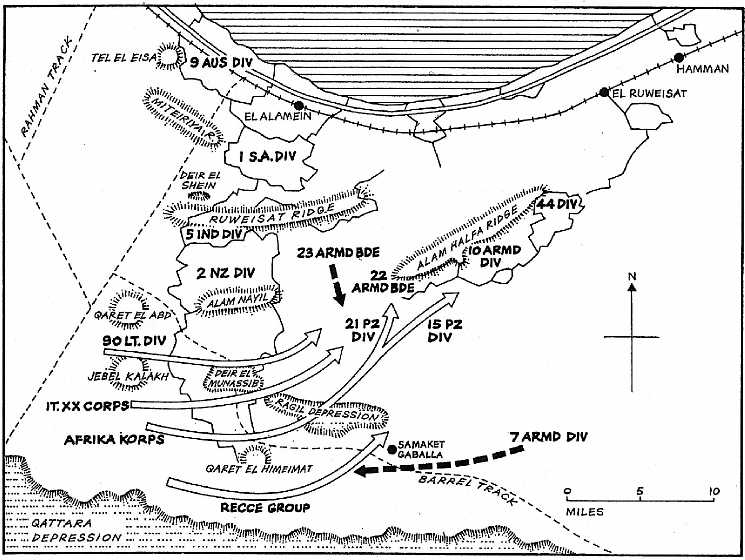
 http://www.desertrats.org.uk/Maps/alamhalfa_map.jpg

History 

Erwin Rommel's final offensive of the desert war was a great chance to use some of my Valentine II tanks as well as some borrowed Crusader I's in an armoured scrap with the Deutches Afrika Korps using there upgraded Panzer III. The Afrika Korps pushed through a lightly defended stretch the the British defensive line and envelop the position from the South. Passing at night through the wide minefields the DAK moved against the Alam Haifa Ridge where the British forces had established a defensive line. The 44th Division held the ridge whilst the 22nd Armoured Brigade newly re enforced with the Valentines of 23rd Armoured brigade counterattacked the German division. Severely constrained by lack of fuel and under frequent air attack the DAK withdrew on the 2nd of September back through the minefield. Marking the end of German strategic initiative in North Africa. Now all Rommel and his men could do was await the British counter stroke.

Terrain  

The table had few features. Mainly dominated by two low rises and a few patches of bushes on the low ground. The two ridges run almost at right angles to each other

Deployment

The events of Alam Haifa suit several of the scenarios but as I wanted to make use of the Mobile Warfare special rule an Attack/Counterattack scenario for the rule book seems perfect.

Special Rules

Duststorm special rule is in efect as is the Mobile warfare special rule. Low on fuel would be appropriate from the British to buy but I did not in this scenario.

Victory  

There are four objectives. The valley marked by a wrecked car in the foreground, the low ridge at the near end of the table, the narrow pass at the far left (marked with a cow) and the valley beyong that marked with a burnt out car. An all objectives claimed victory is possible. Or the usual first to their Battle Rating total.


Deployment 

The DAK out scouted the British and chose the far right corner (by reference to the initial deploymet picture below). The British took the opposite corner
Reconaissance troops would deploy first with other units arriving afetr turn 2

Map

A patch of the Western Desert near The Alam Haifa Ridge 

After Action Report 

Forces 

All forces chosen from the Battlegroup Tobruk supplement ;

forces from 21st Panzer Division
 2 platoons of 3 Panzer III H  both officer with mortar spotter rule
1 Forward artillery Observer team in Light Car
1 Motorised Panzerjager with PaK 38
1 SdKfz 222 Armoured Car
1 Resupply Truck
1 battery of 2 80mm mortars off table

forces from 22 and 23rd Armoured brigades;
2 squadrons of 3 Crusader 1 tanks
1 squadron of 3 Valentine MkII tanks
1 motorised foot patrol 7 men in Morris truck
1 Royal artillery Forward Oberver
2 x 2nd priority artillery requests
1x 3rd priority artillery requests


With the aid of supperior recon forces the German's also get the first turn. The SdKfz 222 siezes the first objective whilst the PaK 38 is toward toward the ridge at the far end of the board. Aggressive reconaissance. Tne British sent out a motorised patrol to sieze there first objective the vally infront of their deployment area. The Morris truch would then hastily withdraw next turn.
The PaK 38 towed by it's halftrack to the ridge dominating the British deployment zone 

SdKfz 222 siezes it's first objective before moving on the sieze the second in the next turn.

British motor infantry grab an objective
The PaK 38 siezes a third objective for the DAK. The position overlooks the entry zone for all the British Armour. First of these to arrive are the three Valentine tanks who turn towards the ridge and begin the long climb under fire from the PaK 38. A single Crusader 1 arrives and takes the PaK 38 under ineffective fire.  The Morris withdraws rapidly whilst the infantry take scant cover in the scattered thorny bushes.
The threat presented by this well sited gun swung the course of the battle

The Germans main force started to arrive and push forward with plenty of orders they quickly solidified the DAK's grasp of 3 of the four objectives. Taking hull down positions or using the ground in the pass to screen there movement from the British

Panzer III go hull down while the SdKfz 222 covers the the forward move in the pass beyond the ridge. 
The DAK had all of there tanks but a lack of orders menat only some able to move forward. Meanwhile the attack by the Valentines of the ridge was failing hit by Antitank fore from the Pak and bracketed by mortar fire first one crew abandoned there tank and fled afetr a direct hit for a mortar bomb then a second abandoned there tank afetr a hit from the PaK. The Crusaders massed ready for a planned attack on the pass. The the British FOO  arriving in a bren carrier had considerable radio trouble leaving the British without artillery support for several turns. despite three attempts to bring the ridge under shellfire nothing hppened!
Abandoned Valentine tanks ... but one finally makes the ridge crest and outflanks the gun

The last Valentine is KO'ed by the supporting Panzer III, That all my best tanks gone . Just the unreliable Crusader left. 

The ridge finally falls under fire from the 3" mortars called up from off table. Phenominal cover saves mean that the PaK 38 is never pinned! Fritz and Gunthar (as we named them) obviously candidates for Iron Crosses with a rich target selection in the valley before them.
The Valentine troop all destroyed the Crudaders change plan. No more attack down the vally it's take the ridge or bust!. Two Panzer III knocked out by two pounder guns in successive turns. But the DAK take advantage of the Crusaders unreaible fule system to cause a breakdown that immobilaise the lead tank. The British had anticipated this problem and brought along a heavy repair lorry.
I desperation the infantry bring the gun under small arms fire. Unable to suppress the crew after several turns they finally killed 2 of the heroic German crew. The last man fails his moral check and suddenly the deadly gun is gone!
The Crusader advance by bounded toward the ridge. Another Panzer III is KO'ed by heavy fire from the Crusaders. The Briish have takeb 21 of 30 BR lost and the Crusaders are starting to run out of ammunition. 
But there are few Panzer III left a brief counter attack across the largest ridge left a further Crusader abandoned due to engine fire but the last Panzers and knocked out with the last Armour piercing round. Phew! That was close. The DAK drew an air attack chit. Luckily the Stuka's didn't swoop. So with British tanks sweeping forward to take on the rear areas with MG fire the DAK decide to withdraw 

The British final BR 

The DAK final BR 2 under the total required 

So the 8th Army can claim the better part of a draw! There is alot of damaged tanks around the ridges. Another fun close run Battlegroup game.


Tuesday, 19 May 2020

On the workbench - Bishop Self Propelled Gun


The artillery vibe continues under lockdown I have upgrade a OP and a Bishop Self propelled gun. Britains first attempt at an SPG.  I painted up this gun  as a First Army gun for my Mid War British Army. Only deployed in Tunisia and Italy. These vehicles  are very characterful, I love the Heath Robinson look of the Bishop.
I like a well worn look to my Mid War British vehicles so lots of mud North African mud on this one 
extra stowage and crew from AB miniatures 

Losts of extra mud on the rear deck 
File:The British Army in Tunisia 1943 NA1449.jpg - Wikimedia Commons
my main ... but not only reference image https://commons.wikimedia.org/wiki/File:The_British_Army_in_Tunisia_1943_NA1449.jpg

 The final addition is this observers vehicle  inspired  by an image from the Taranto landings. PSC model  bren gun from the bits box

Add caption

THE INVASION OF ITALY SEPTEMBER 1943 | Imperial War Museums
The Invasion of Italy thanks to the Imperial  war Museum https://www.iwm.org.uk/collections/item/object/205204293


The crew are  a mix of PSC, HaT and Milicast

Monday, 11 May 2020

On the workbench Imperial Japanese Army Support units

Thats the Imperial Japanese Army force for Burma 44-45 done with a few support options Reconaissance and anti tank defences. I may invest in some Chi_Ha  tanks but first some games!
 A type 97 Te-Ke tankette reconnaissance vehicle 37mm gun version from 172scale miniatures
 Advancing with a foot patrol and sniper


Close up of a spider hole. I made several of these out of the extra miniatures from the platoon. They have either Type 99 LMG or the Type 97 20mm AT rifle  which I had a few spare. Liberally scattered around the battlefield should give a nasty surprise to pass allied infantry or armour.   


 I have made 6 camouflaged spider holes
 Two three man improvised Antitank teams. Antitank mines on a bamboo pole

 Close up of one team
 Another team stalk a Grant tank

 A 50mm grenade launcher battery for local support 
My FOO with scissor scope and RT operator. Artillary will be the main Anti tank defence for the Japanese

Sunday, 26 April 2020

On the Workbench British Anti Tank Battery and M5 tows Tunisia 1943

These PSC M5 half tracks where bought for the big Market Garden weekend in 2018 (see a paint job to far). I have too many for  my small NW Europe  Irish Guards. So these I have found a use for in my main period - Italy and Tunisia in 1943.  The main use for the lend-lease half track in this theatre was in Royal Artillery particularly Anti-tank battalions. I will use these in Tunisia and Italy in 1943-1944 as tows for 17 pounder and 6 pounder anti tank guns as well as forward observers and resupply vehicles and, eventually, as a ride for my Royal Engineers.
 This anthe M5 towing my 17/25 pounder Pheasant. I added the canvas tilts using PVA soaked tissue and brass rod.

 Deployed 17/25 pounder with AB crew
 Really enjoyed painting these as First Army crew
 Crew from a different angle
 Clse up of the 6 pounder gun battery on the move
 A good view of the tilts cheap to do and quick I really like the effect/ The guns are the early version of the six pounder without muzzle suppressor from Grubby.
 The six pounder deployed with AB crew for this crew the NW Europe  but painted to look a little more mediterranean.
 Loader team for Battlegroup using spare figures from the six and seventeen pounder crew Camouflage in desert pink and green


The six pounder has the AB western desert crew - more of an Eigth Army feel!

 The Western Desert AB miniatures loader team for Battlegroup These loader teams will get heavy use also be useful with my twenty-five pounder artillery battery

 Deatail of the crew in this ruined Tunisia building


My Antitank battery takes on three Early War Miniatures Panzer III's,
Let see how Column Bari like a wall of six pounders between them and Medenine. See my campaign reports and ARR for our Battle of Medenine campaign.

Finaly my two pounder with its Morris tow. All three guns in use by the end in North Africa .
 The two pounder deployed
 AB crew and toothbrouch thorn bush.

 With the wheels on for towing.

Scenario and AAR Hondeghem 27 May 1940

  Battle of Hondeghem (27 May 1940)  Scenario for Battlegroup Blitzkrieg  The Battle of Hondeghem is one of the most famous small-unit rearg...